Pages

Wednesday, 31 October 2012

Happy Halloween

Well it's October 31st, and not only is it Halloween but today is my Grandmother, and her twin sister's birthday.  

Happy Birthday nan!

Now on for the fun stuff.
This year I decided instead of just sending in treats for my daughters class, that I would put my cricut to use.  I used both the Art Philosophy and the Artiste to create these cute bags and coffins to hold the kids treats.


My daughter, Jaymee, is dressed up as Ghoulia Yelps from Monster High.  I'll add a post later to show you what my younger kids dressed as for Halloween this year.


Happy Halloween!

Tuesday, 23 October 2012

New Stamping Technique to show you with Clearly the Best


The Stamp Behind the Mask: Clearly the Best, Stamping with Close To My Heart Episode
“The Stamp behind the Mask” features masking portions of your stamps so that you only ink and stamp what you want to see.


 Also My Craft Channel and Close to my Heart feature a give away each week.

THIS WEEK'S GIVEAWAY DETAILS

Three lucky winners will receive the My Acrylix® Words of Comfort Stamp Set.


HOW TO ENTER 
Watch this week's “The Stamp behind the Mask” episode and leave a comment on My Craft Channel's page telling us which phrase you would use the most. 

BONUS ENTRIES (3 possible): 
  1. Leave a comment on the CTMH Facebook page thanking them for their support of My Craft Channel and letting them know YOU love their show on MCC! 
  2. Facebook or Tweet about this week's CTMH episode and come back and leave a comment on My Craft Channel's page saying you did. 
  3. If you haven't already, visit the CTMH website and locate the nearest CTMH Consultant using their consultant locator. Let us know the suggested consultant's name in the comment section on our page.(or feel free to write my name in as your independent consultant. :) )
Contest will close at 11:59pm MST on 10/29/12. Winners will be announced on 10/30/12. 


Sunday, 21 October 2012

Christmas cards from Card Class/Card Kit

In our card class this past Friday we started making our Christmas cards.  We made 5 cards all using different stamps, but keeping with the same color scheme.  Our colors were Twilight, Crystal Blue, White Daisy, Slate & Whisper. On 3 of the cards I used the Wonderland which is now retired, but fit my colors perfectly.  Also, we used the Cuttlebug to emboss some White Daisy Cardstock.


This first card has a Crystal Blue base, then an embossed snowflake layer that we sponged with Crystal Blue Ink.  Then we added a layer of Wonderland pattern layered with Crystal Blue.  The Snowman is stamped in Twilight on Twilight Cardstock.  The sentiment is stamped on Crystal Blue,using the same color ink.  The strip of Whisper Cardstock is stamped in Slate Ink.  All Stamps used are from the Winter Joy Stamp Set(retired).


With this lovely Peace card, we started with a Crystal Blue base, and layered the Wonderland pattern ontop.  Using the Whisper Cardstock layered with the Crystal Blue Cardstock we then stamped our Dove image and sentiment using the White Daisy Pigment Ink.(Please note when stamping with pigment inks, they take longer to dry)  The stamp set used here is the Blessings of Peace Stamp Set.


This super cute snowman card uses the Flakey Friends Stamp Set.  Here we choose 2 of the 3 snowmen from the set, and lined them up on the stamp so the bases were touching.  We then colored in the scarfs and hats using our new alcohol markers(Sweet Leaf and Sorbet).  To get the nose to look more orange, (as I didn't have an orange marker) I layered the darker of the 2 Sorbet markers to get the orange color.  The first layer is the Crystal Blue, then using the White Daisy embossed in snowflakes, we cut 3 strips to make panels.  Then layered the snowmen and sentiment on top of Whisper Cardstock.


 I think is card is my favorite, it is just so simple, but so polished.  The base is the Crystal Blue Cardstock, and then using my new snowflake swirl folder we embossed the image on White Daisy Cardstock, then using a sponge dauber highlighted the embossed image with Crystal Blue Ink.  Using the Snowflakes Stamp Set stamped the sentiment in Twilight Ink.  Cutting 2 snowflakes from the Art Philosophy Cartridge stamping the bottom image in Slate, and the top in Twilight.  To make the snowflake pop off the card, we adhered 3D foam tape between the card and each snowflake.


This last card started with a slate base, then layered with Wonderland.  The stamps used here are from the I Believe Stamp Set.  The santa and the snowflakes are stamped in Crystal Blue ink on White Daisy Cardstock and layered on Crystal Blue.  The sentiment is stamped in Twilight ink and layered on Twilight Cardstock.  Then it is popped off the card with some 3D foam tape.  I also added some bling to the card with some sparkles.

To purchase this card kit, prestamped for $15 local (+$5 shipping non-localcontact me to make arrangements.  If you want to create your own version of these cards you can find the products I used, (minus the retired products) here.

Tuesday, 16 October 2012

Are you mad about CTMH's New Alcohol Markers?

Alcohol Marker Madness


I just simply love the new alcohol markers by Close to my Heart.  If you haven't tried them yet, you'll want to watch this video with Kristine and Monica.  Not only will you learn about the markers, but you're learn some new techniques that will make you want to try them too.  I know I can't wait to make some projects using the Versamark Ink and embossing powder's along with my new alcohol markers.

What will you create?


If you want to create these projects or some of your own using our new alcohol markers, or the embossing products used during this segment, please contact me, all my information can be found on my website.

Monday, 15 October 2012

Cross Canada Blog Hop -10/15/12- My Creations Canvas Journal


Welcome to our October Cross Canada Blog Hop! This month our project is the My Creations Canvas Journal. This product can be found on page 132 of the Current Idea Book, purchased exclusively through a Close to My Heart Independent Consultant for only $8.95.

In this hop, you will see how our Crafty Canadian Consultants have decorated their Canvas Journals! We hope you enjoy our blog hop today!

Today our blog hop starts in Nova Scotia with me, Michelle S. So if you are just starting our Hop then you are in the right place. This is a circular hop, so where ever you start, we are happy to have you follow along. We hop to inspire you with our creations.


I really like the La Belle Vie paper packet, so I used it as my inspiration for this design. First I distressed the whole canvas journal with Blush Ink. Then using stamps from 3 different stamp sets, January's SOTM "Happy Valentine's",Jardin, and a retired stamp set "Butterfly Wings" and using multiple color inks, Slate, Ruby, Blush and Black, as well as Sweetleaf Markers, and a retired Tulip Marker to create the random stamping. After I had all my images on the canvas, I then distressed it further with the Slate ink.

Your next stop on the Cross Canada Hop is Joanne's Jags Scrapin Corner blog.

Here is a complete list of the blog hop in case you get lost along the way:

Thanks for hopping along with us - we hope we were able to inspire you to create your own version of My Creations Canvas Journal. Join us again on November 5th when we showcase a series of 3 Christmas Cards made from one of exclusive lines of My Reflections Paper Packs.

Saturday, 13 October 2012

October Stamp of the Month "Very Merry Christmas"

Welcome to our October Stamp of the Month Blog Hop!  This month Close to My Heart is offering a stamp set called "Very Merry Christmas".  This set can be purchased exclusively through a Close to My Heart Independent Consultant for only $5 with a qualifying purchase of $50.  (That’s a $17.95 value!)

October Stamp of the Month
In this hop, you will see projects featuring this fun stamp set from many talented crafty ladies!   Enjoy  our blog hop - we hope we inspire you to create your “very” own Merry Christmas projects!  
We are having a giveaway – that’s right blog candy for you hoppers! Carolyn of Nuts 4 Scrappin (add URL as link to blog name) is giving away a stamp set to one of our hoppers! She is giving away a stamp set called "Bonjour". You can see a picture of the stamp set on her blog. All you have to do to be eligible to win is to leave a comment on each blog and become a follower of Carolyn's blog.
If you have just hopped onto my blog, please start at the beginning at Love 2 Create
If you came from Caution: Crafting is Contagious then you are in the right place!

I made a series of 3 cards using different images from the SOTM and the retired Believe B & T Duos Paper.


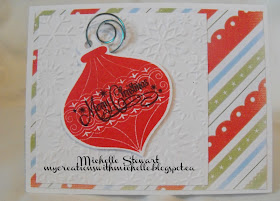
This first card I cut the B & T paper at 4" x 5 1/4" to leave a white border. Then taking some White Daisy CardStock,cut at 3 3/4" x 3 3/4", I ran it through my cuttlebug using the Snowflakes folder. Then using the Artiste cartridge I cut the ornament shape that corresponds with the image on the SOTM. Then using Holiday Red Ink(retired) stamped the ornament. Next using Black Ink I stamped the Merry Christmas sentiment from Holiday Cheer stamp set(retired), then placed some 3D Foam Tape to pop the ornament and placed this round paperclip through the hole as the hanger.


For this card I cut my base the same leaving the outer border of card white. Then using the plaid side of the B & T Paper I cut a strip 4" x 1 1/2" and a second piece I cut 2 1/2" x 2 1/2". Using White Daisy CardStock, I then cut a square 2 1/4" x 2 1/4". Cutting the shape that corresponds with the SOTM from the Artiste Cartridge I then stamped the image, and popped it using some 3D Foam Tape.


This last card I used the Red Plaid for the base of the card. Then cutting a piece of patterned paper 2 3/4" x 3 1/2" I adhered a piece of White Daisy CardStock on top, cut at 2 1/4" x 2 3/4". The first mitten is adhered right to the cardstock, the second is popped using 3D Foam Tape. Then I had some sparkly twine and adhered it 2 both mittens. The mittens also have a corresponding shape to cut from the Artiste. The sentiment comes from the SOTM too.
What I love the most about this SOTM "Very Merry Christmas" is that it has 5 items that correspond with cuts found on the NEW Artiste Cartridge.


Your next stop on our Very Merry Christmas blog hop is My Scrappy Ideas

Here is the complete lineup in case you get lost along the way:
  1. Lucy ~ Love 2 Create
  2. Darla ~ Caution: Crafting is Contagious
  3. Michelle ~ My Creations With Michelle
  4. TinaGale ~ My Scrappy Ideas
  5. Jennifer ~ 4 Hearts Scrapbooking
  6. Carolyn  ~ Nuts 4 Scrappin'
  7. Stephanie  ~ The Quilted Scrapper
  8. Amanda ~ Scraps of Love
Thanks for hopping along with us - we hope we were able to inspire you to create your own "Very Merry Christmas" projects.

Saturday, 6 October 2012

Make it from your Heart Blog Hop


Today we will show you how to Make It From Your Heart!  Jeanette Lynton has created a brand NEW “how-to” program to not only guide you but also inspire you to create beautiful artwork.   This amazing publication has so many different pattern blueprints that you can interpret in ANY WAY you want!


Through our blog hop, we hope to inspire you to use your own artistic instincts to interpret and create your own artwork.  Each of our crafty consultants has chosen a different page of this book to create two projects for you – that’s right two projects with the SAME pattern!  One project will follow the blueprint pattern as laid out.  The second project will use the pattern “with a twist”  to show you how versatile the patterns are.

We are having a giveaway – that’s right blog candy for you hoppers!  Lucy of Love 2 Createwill be giving away a copy of the Make It From Your Heart – Volume 1.  All you have to do to be eligible to win is to leave a comment on each blog.

If you just happened to come to this blog, you should begin your hop at the beginning at Lucy's blog -Love to Create.

If you came from Darla's blog Caution: Crafting is Contagious, you’re in the right place!

 My project is found on page 24, pattern 44 in the publication "Make it From Your Heart" which can be purchased exclusively from your Close to My Heart Consultant for only $7.95.


My first project is the card pattern as found on page 24.


I used a Cuttlebug folder to create some reversed Embossing for my textured paper. To get this effect I inked the folder with Heavenly Blue Ink and the paper turned blue leaving the White Daisy Cardstock embossed. My next layer is from the Dotty for You Paper Packet, followed by another textured layer with Lagoon Ink. The Green Dotty is also from the Dotty for You Paper Packet. Then I added my sentiment from the Casual Expressions Stamp Set in Sunset ink.

My second project for this blog hop is a converted version of the card design. I cut a Gable Box from the New Artiste Cricut Cartridge after stamping my own pattern onto the cardstock.

I used the flower from the Card Word Puzzle Stamp Set using Outdoor Denim, and New England Ivy, the cardstock used for the box is the Smokey Plum. I then used the Outdoor Denim Cardstock for the first layer. The second layer I distressed using the New England Ivy Ink to carry on the colors from the box. Then instead of using the exact shape from the pattern, I altered it, I used a flower also found from the Card Word Puzzle Stamp Set, and using the Smoking Plum Alcohol Markers and Outdoor Denim Markers to color it in to get this effect.

The next stop to making it from your heart is Maria's blog Maria's Paper Craft Place

Here is the list of all the talented consultants who are participating in this months blog hop:


  • Lucy ~Love 2 Create   
  • Darla ~Caution: Crafting is contagious
  • Michelle ~ My Creations With Michelle
  • Maria ~Maria's Paper Craft Place
  • Theodora ~Celebrate Crafts
  • Bethany ~Stamping at Home
  • Stephanie ~The Quilted Scrapper
  • Wendy ~My Scrapbooking Blog