Showing posts with label Card Class. Show all posts

Wednesday, 9 October 2013

Sparkles, Shimmer and Snowflakes equals Happy

So, I've been in a Christmas card mode this past week.  Making cards for the markets I'll be working over the upcoming months....I've been using up my Wonderland paper, and since it was sitting out, I decided to make a card using that paper line.

The sketch this week is by one of our design team members, Anna-Carin.  I think it is a fabulous sketch, and was definitely a challenge for me.  Here is Anna's sketch.


Here is what I came up with, I really hope you like it.


Supplies used:

Wonderland paper (retired)
Festive Thoughts Stamp set (retired)
New Fallen Snow Stamp set (retired)
Snowflakes (D1480)
Silver Shimmer Trim(Z1799)
Sparkles Flourishes (Z1708)
Black Ink (Z2105)
Crystal Blue Ink (Z2117)
Twilight Ink (Z2160)
Twilight CS (X5666)
White Dasiy CS (1385)

Don't forget to pop over to the Atlantic Hearts Sketch Challenge to check out the design team's creations, as well as the entries we have so far.  The challenge is open until 11:59 pm Sunday evening AST.

Saturday, 24 August 2013

August Drop-In Card Class

So on Friday I had a drop-in card class at my home, which was fantastic.  Darla, my partner in crime, and myself got to meet 2 members of our Design Team.  I'm sure by now you know that Darla and I run the Atlantic Hearts Sketch Challenge.  Well 2 of our design team were visiting Nova Scotia on vacation and asked to come to one of our classes.

The very first card we decided to make was one I cased from Laura Lee Ryan, using the Happy Autumn Stamp Set(D1550).  Well, I got all the pieces out but couldn't find where I had put the stamp.  I searched high and how, and had Darla searching too, but we just couldn't find it.  So after making 3 or 4 more cards, we gave up the search and decided to improvise.  So here is my cased card.
It is fabulous, isn't it!  Thanks for the inspiration Laura Lee Ryan, but since we couldn't find the missing stamp we grabbed the March Stamp of the Month, Floral Happiness, and a sentiment form the stamp set D1361 Thank You(retired).


So, I thought I would do a post to show you that sometimes when you don't have the stamp you want, you can improvise, grab another stamp set that is similar and still create a masterpiece.  Oh, and of course not even 20 minutes after finishing this card, I found the missing stamp set.

Wednesday, 26 June 2013

Thanks a Bunch card Using Sketch #9

This week is super fun, and even though I won't be home for the last day of school, I made this card for my daughter to give to her teacher.  I used the current Sketch over at Atlantic Hearts Sketch Challenge.


So, yes, I'm not home this week.  So where am I?  Darla, myself and fellow consultant Rosalynd Kelly flew down to Orlando.  We are attending our annual Close To My Heart convention at Walt Disney World.  Don't worry I will be posting photos from my trip when I return.  So without further ado, here is my card.


My card base is black, and I added a white mat on the inside for writing a message.  The front of the card is all scrap pieces of Cardstock.  I used Ruby, Cotton Candy, Hollyhock, Honey, Pear, Twilight, Outdoor Denim, Smokey Plum, Crystal Blue and Sunset.  The sentiment is from the Thank You stamp set, and is stamped on White Cardstock in Black Ink.  Hope you enjoyed this fun pieced together card.  I had fun making it.

Now head on over to Atlantic Hearts Sketch Challenge to see what our Design Team has created this week.

Monday, 27 May 2013

Monday means a new Sketch at AHSC

Sketch #5


What will you create using this weeks Atlantic Hearts Sketch Challenge?

We hope you play along, and don't forget to come back on Wednesday to see my creation using this sketch.  

But I have a treat instore for you today, I've made 2 cards which I will use in my upcoming card class too!  The reason I made these cards is that we are getting close to the wedding season, and my girlfriend is getting married this summer, her colors include Navy(Outdoor Denim), so I incorporated the color into the cards.  I made one to go with her Bridal Shower gift, and the second card will be her wedding card.

For these cards I used a White card base, and added a piece of patterned For Always as a mat.  Adding a second mat in white CS then I took a second piece of  patterned For Always, and applied the Direct ink technique to color it the Outdoor Denim color.  Added a strip of the zipstrip found at the top of each patterned page, and then used the Frame Flair Stamp set to frame each sentiment.

 If you don't remember the Picture frame I covered I've posted it here again.

Sunday, 7 April 2013

Drop in Card Day

This past week I've been creating cards for a combined event with fellow consultant and friend, Darla Haverstock.  We are trying a new approach for our customers....a drop in card day at our homes.  Yesterday was Darla's event and it went pretty well, now this coming Saturday, April 13th, it's my turn.

Anytime between 10am to 5pm you are able to drop in and make some cards with me.  The cost per card is $2.50, and you can make as many as you want, right now we have 16 designs to choose from.  Each month we will have new designs from you to choose from.  So for a fraction of the cost of what you would pay at Hallmark or Carlton Cards you can stock up on some great everyday occasion cards.


Monday, 18 March 2013

2 New Card Creations

Yesterday my oldest daughter, Jaymee wanted to  make some cards with mommy.  So down to the craft room we went.....and this is what we created.

 This first one is stamped on a sheet of White Daisy Cardstock then adhered to the card base using 3D Foam Tape.  I used the large flower from the Girls Rock Stamp Set, and stamped it using Buttercup, Sweet Leaf, Sorbet and Sunset.  Then I stamped the sentiment in Crystal Blue ink, it is from the Card Chatter-Sympathy stamp set.

The second card, I had already had the base of it ready to go, but wanted to add a little dimension, so I stamped the Whale onto a separate piece of cardstock, and let my daughter color it in, she did pretty good.  I then fussy cut the whale out and adhered it to the shape of the whale already stamped onto the card.  Then I added a little liquid glass to the eye and the water spray.  The base is the back of the Chantilly bold print, and the Cardstock is Sunset.  The image and sentiment is stamped in Twilight from the New Baby stamp set.  I added a drawn boarded to the Sunset Cardstock to add a little more detail, using the legacy writers pens.

Hope you like what we created yesterday....it's fun to craft with my daughter.

Sunday, 24 February 2013

Card Class Creations

So just this past Friday evening I had my monthly card class where we created some awesome cards used Chantilly and Claire, 2 of our newest paper patterns.

Here is a small sampling of what we made.


I hope you have enjoyed seeing some of our creations over the past few months.

Saturday, 8 December 2012

Feature Christmas Card Day - Card 6

Well, today is Card 6 that means the end of my card creations, but tomorrow's post I will show you the 6 cards that Darla taught at class.

Once again we used the Pear & Partridge Paper. However, the White Daisy is mounted this time on New England Ivy Cardstock.  We also used the Ruby cardstock for this design as well.  The stamp set used in this design is Merry & Bright.  The wreath is popped up off the design using 3D Foam Tape


I really like the design of this card, and I like how the some of the class played with the design and changed the layout.  I hope you have enjoyed my card designs, and that you will come back tomorrow to see Darla's cards.

Friday, 7 December 2012

Feature Christmas Card Day - Card 5

So we are at card 5 today, and here we've used the Pear & Partridge again on top of an Olive Cardstock base.  Then stamping the sentiment from Christmas Love stamp set in New England Ivy/Ruby on White Daisy cardstock which is matted on Ruby cardstock.  We also dyed some Color Ready Ribbon in Ruby(which is super messy), not recommended to be done when you have little kids near by.  Then we added some Sparkles.


The ladies had such fun playing with the layout of this card and just made minor tweaks to make it their own.  All in all I think they did a fabulous job.

Thursday, 6 December 2012

Feature Christmas Card Day - Card 4

Well, today I'm featuring a card that I simply love because it is simple but so much fun.  We used the Pear & Partridge Paper to create this card.

We used Ruby cardstock and cut the tags on White Daisy cardstock.  We used Olive and New England Ivy Ink, as well as Harvest Bakers Twine, and the afternoon distressed their tags using Chocolate Ink.  We used the Urban Alphabet Stamp set for the letters.

Check back tomorrow for card 5.

Wednesday, 5 December 2012

Feature Card 3 -Christmas Card Day

So this is card 3 of the 6 that I taught at our first Christmas Card Day.  We are planning on doing this each year, plus we are already in planning for our Spring Card Day.

If you are interested in attending you can contact me via email here.


For these cards we started with a Whisper cardstock base, then we layered Crystal Blue cardstock.  The image and sentiment are stamped using Twilight ink, on Twilight cardstock which is matted on Whisper cardstock.  We also took the 2 verses that come with this stamp set and used it as a background stamp.

Tuesday, 4 December 2012

Feature Christmas Card Day - Card 2

As promised here is the second card we made at our first Christmas Card Day.


 This card is made using the Snowflakes stamp set, using Crystal Blue, Whisper, White Daisy, and Twilight cardstock.  The snowflakes were cut using the Art Philosophy cartridge, and using Twilight, Slate and Crystal Blue Ink.

Monday, 3 December 2012

Feature Christmas Card Day - Card 1

So today's post I am featuring cards made my some of our participates in our 1st Christmas Card Day.  The class was taught by Darla and myself.

So there are 2 pictures being posted, the first is from the morning group and the second from the afternoon group.


The stamp set that we used here is Flakey Friends, one of my favorites, as it has 3 cute snowmen....we only used 2 of those snowmen, and we used White Daisy and Whisper cardstock...and we used Crystal Blue and Twilight inks, plus various makers.

We had lots of fun, and I hope that everyone enjoys our cards as much as we had fun making them.  Watch tomorrow for card 2.

Sunday, 21 October 2012

Christmas cards from Card Class/Card Kit

In our card class this past Friday we started making our Christmas cards.  We made 5 cards all using different stamps, but keeping with the same color scheme.  Our colors were Twilight, Crystal Blue, White Daisy, Slate & Whisper. On 3 of the cards I used the Wonderland which is now retired, but fit my colors perfectly.  Also, we used the Cuttlebug to emboss some White Daisy Cardstock.


This first card has a Crystal Blue base, then an embossed snowflake layer that we sponged with Crystal Blue Ink.  Then we added a layer of Wonderland pattern layered with Crystal Blue.  The Snowman is stamped in Twilight on Twilight Cardstock.  The sentiment is stamped on Crystal Blue,using the same color ink.  The strip of Whisper Cardstock is stamped in Slate Ink.  All Stamps used are from the Winter Joy Stamp Set(retired).


With this lovely Peace card, we started with a Crystal Blue base, and layered the Wonderland pattern ontop.  Using the Whisper Cardstock layered with the Crystal Blue Cardstock we then stamped our Dove image and sentiment using the White Daisy Pigment Ink.(Please note when stamping with pigment inks, they take longer to dry)  The stamp set used here is the Blessings of Peace Stamp Set.


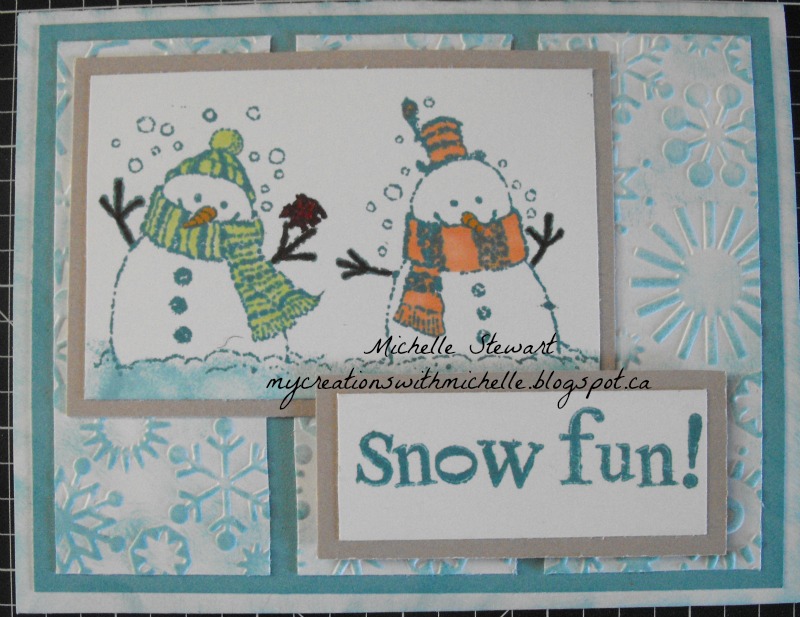
This super cute snowman card uses the Flakey Friends Stamp Set.  Here we choose 2 of the 3 snowmen from the set, and lined them up on the stamp so the bases were touching.  We then colored in the scarfs and hats using our new alcohol markers(Sweet Leaf and Sorbet).  To get the nose to look more orange, (as I didn't have an orange marker) I layered the darker of the 2 Sorbet markers to get the orange color.  The first layer is the Crystal Blue, then using the White Daisy embossed in snowflakes, we cut 3 strips to make panels.  Then layered the snowmen and sentiment on top of Whisper Cardstock.


 I think is card is my favorite, it is just so simple, but so polished.  The base is the Crystal Blue Cardstock, and then using my new snowflake swirl folder we embossed the image on White Daisy Cardstock, then using a sponge dauber highlighted the embossed image with Crystal Blue Ink.  Using the Snowflakes Stamp Set stamped the sentiment in Twilight Ink.  Cutting 2 snowflakes from the Art Philosophy Cartridge stamping the bottom image in Slate, and the top in Twilight.  To make the snowflake pop off the card, we adhered 3D foam tape between the card and each snowflake.


This last card started with a slate base, then layered with Wonderland.  The stamps used here are from the I Believe Stamp Set.  The santa and the snowflakes are stamped in Crystal Blue ink on White Daisy Cardstock and layered on Crystal Blue.  The sentiment is stamped in Twilight ink and layered on Twilight Cardstock.  Then it is popped off the card with some 3D foam tape.  I also added some bling to the card with some sparkles.

To purchase this card kit, prestamped for $15 local (+$5 shipping non-localcontact me to make arrangements.  If you want to create your own version of these cards you can find the products I used, (minus the retired products) here.

Tuesday, 25 September 2012

First Meeting of Card Club 101

Friday, September 21 was our first meeting of Card Club.  I have 9 members plus myself with room for 1 more.  Friday we made 3 cards using Avonlea B&T Duos Paper, Colonial White CS, and Smokey Plum CS. We also each decorated card boxes using the Smokey Plum CS and Avonlea paper.  Here are some of the designs made in our class.


Please leave comments for me to pass onto my class.  Most of them have never created projects before.....thank you!

Saturday, 16 June 2012

Happy Fathers Day

Wishing my husband, and father of my 3 amazing children a Happy Fathers Day.  Also would like to wish my father and father-in-law a Happy Fathers Day.

So with that done, I'll now show you the cards I made using the Art Philosophy cartridge and Fanfare paper.

So I cut the card from colonial white cardstock, the background from Fanfare, and the stars from Dutch Blue cardstock and Honey cardstock.  I layered the stars and to give it dimension I put a glue dot between the blue and yellow.  Then I stamped DAD on the front using the Urban Alphabet.  Pretty simple and I think it turned out wicked!

I also made some Fathers Day cards from the kids to give to their grandfathers.  I used the Miracle paper, and let my oldest daughter play with the design.  This is what she came up with.
Once again the Art Philosophy cartridge was used to cut the cards and the designs used.  She used Olive and Chocolate Ink to stamp and distress, and the stamp used here is from the Pemberley Workshop.

My husbands grandfather's birthday is in a couple of days so we made his birthday card and his fathers day card from the Miracle paper aswell.  The stamp used here is from the Family Love stamp set.

Fathers Day Card

Birthday Card


 We had lots of fun making these cards, and I loved having my daughter help me.  Thanks Jaymee.