Showing posts with label resist embossing. Show all posts

Friday, 12 September 2014

Brae-er's Team Blog Hop - Resist Embossing

With school now being back in the full swing of things, Team Brae-er's blog hop is going to show you how to create projects using different techniques.  If you have come from Brae's blog then you are in the right place, and you will also find the full hop list on her blog.

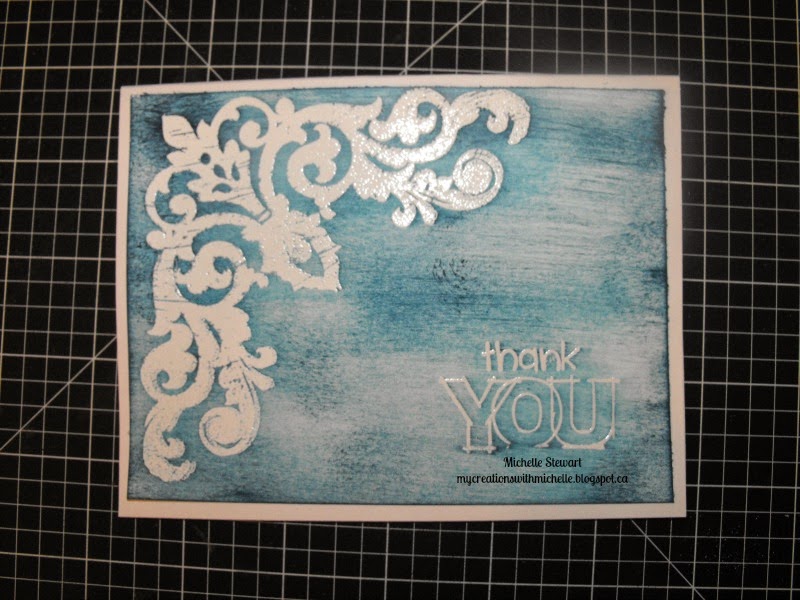
For my project I decided I would teach you how to create a card using the resist embossing technique.

First choose you stamp, cardstock, and embossing powder.  Then you want to prepare your cardstock by precutting it to the size you want it to be, in this case it is 4"x 5 1/4".  I have this little bag that I filled with baby powder and I dust that over the cardstock to prevent the embossing powder from sticking where I don't want it to be.


Then using Versamark Ink I inked up my stamp and stamped it onto the cardstock.  Because Versamark Ink is clear you won't see it in the photo.

I then used Clear Detail Embossing powder so that the image and sentiment will remain white.


It is very hard to see the embossing powder, but believe me it's there.  I placed a sheet of white printer paper under my project so that I can use that to pour the unused powder back into the container. Next choose your ink colour. I choose Pacifica.


I inked up my sponge and rubbed over top of the whole piece of cardstock.  Now do not be alarmed when you see that the embossed image takes on ink, all you need to do is have a lightly damp cloth or tissue on hand and wipe off the ink.  All done.  Now apply your cardstock to your cardbase and you are done.


Now keep hopping as we have lots of amazing techniques to share with you.  Your next stop is Chris and she is playing with reinkers.

Wednesday, 20 August 2014

Grateful with AHSC #69

This week's sketch I decided that I wanted to try the new technique of using Painter's Tape to apply ink to my card.  I've seen some fabulous creations using this technique and couldn't wait to play, but I decided I wanted to use 2 techniques....my all time favourite technique is resist embossing.

So here is this week's sketch:

Here is my creation:

I used Versamark Ink for the images and sentiment, adding White Detail Embossing Powder and heat set it. Then I grabbed my roll of painters tape and inked up 2 stripes of each of the 3 colours, Glacier, Crystal Blue and Indian Corn Blue.  I applied the painters tape to the card and gently rubbed across the top to transfer the ink to the card.  I hope you enjoyed my creation this week, and I hope you decide to get inky too.

Now hop on over to Atlantic Hearts Sketch Challenge and visit our Design Team and see some of their amazing creations, I know I was blown away at their creations this week.

Friday, 1 August 2014

Annual Inspirations New Product Blog Hop

Being a consultant we are privileged with being able to order prior to the release of the new catalogues so that we can create lots of new creations to inspire you.  I am so in love with all of the new products in this 1st Edition of our Annual Inspirations Catalogue, which is now a year long catatlogue.  This catalogue has over 250 new items, which include 9 new paper packages, 5 new PML kits and so much more.

This blog hop is run through a link up, so all the participants will have their links in thumbnails at the bottom of this post. Just click on the first one, and when you are finished there, scroll to the bottom of their post to click on the next link....and so on!  Pretty simple, right!

I fell in love with the Brushed paper, maybe it's because I have 2 girls, and this pink floral paper just screams GIRLS.  Here is my creation:
 I've used a strip of Jupiner cardstock and a strip from the backside of this floral paper and the scallop border punch to create the strip of scallops on the left side of the card, layered with a piece of the Zipstrip.

The sentiment is stamped in Versamark Ink and I heat embossed that and the 3 butterflies using Clear Detail Embossing Powder.  Then using sponge daubers and the new Canary Ink(yellow) and Jupiner Ink I used a technique called resist embossing to create my own colouring.  The remaining butterflies are stamped with the new Pixie Ink(pink).
This butterfly is cut out twice and layered to look like it is flying off the card.  I added 3 Bitty Pearls to dress it up.
This large butterfly is stamped in Black ink and Pixie ink is then covered in Liquid Glass to create my own embellishment. All images are from the Stamp Set Your Own Kind of Wonderful(D1627).

This card was so fun to create, and I'm excited to share my projects with you, but scroll down and go check out all the fabulous projects created by my fellow consultants.  Hope our creations are able to inspire you to get inky too!


Wednesday, 21 August 2013

Sunshine and Smiles Card for Sketch #17 at AHSC

So yep, you've probably figured out that this post is related to the fact that this is week 17 over at Atlantic Hearts Sketch Challenge.  So I'll just cut to the chase, here is the sketch for this week:

So, incase I haven't told you, when I make the sketches, I base them on how I plan on making my card/scrapbook page, or project.  So, my sketches are really just hen scratching that I scan and send to Darla, and she then takes them and digitalizes them.  She is my techie guru.  Without Darla the AHSC would not be so wonderful.  Plus we have a really great design team, who apparently had a difficult time with my sketch; but still managed to come up with some great creations.


So for my card I wanted to keep the base of the card one layer, and wanted to add dimension through the embellishments. I started with the Buzz & Bumble Honeycomb pattern paper and stamped the sentiment right on the paper in Cocoa Ink.  The sentiment comes from the Stamp Set Special Friendship.
Close To My Heart introduced a new sheet of Irresistibles Dimensional Elements, Hexagons!  What I love about these Dimensional Elements are that they have a resist pattern that shows through when covered in ink. The colors used on the Hexagons are Sunset, Honey, Cocoa, Goldrush and Sweet Leaf.

So now that you've had the chance to find out how I made my card, you can pop over to AHSC and check out the creations from the Design Team.   Please remember to leave comments, we love to hear from you!

Wednesday, 14 August 2013

Resist Embossing with AHSC Sketch #16 - For You

This week over on Atlantich Hearts Sketch Challenge we are on our sixteenth week.  We've had entries from Australia, Sweden and the UK.  The entrants have been creating some pretty amazing artwork, and sharing it with us on our blog.

Here is the Sketch for this week:


Here is my card:


So for my card I started with a white card base and I added a piece of Crystal Blue Cardstock to the first side.  Then I added a piece of Pacifica cardstock to the other half.  On a piece of White Daisy Cardstock I stamped in Colonial White Pigment Ink using the floral stamp from In the Background, and then heat embossed with clear embossing powder.  Then comes the fun part, it is called Resist Enbossing.  Using 4 sponge daubers, and starting from the top and working down I inked up over the embossed image.  The colors I used are Sky, Crystal Blue, Twilight and Pacifica.  
The sentiment is from Say It In Style, and I used Black pigment Ink.  The Flower and Butterfly were then coloured with Sky and Pacifica Alcohol Markers.  I placed a Crystal Button in the center of the flower for the butterfly to perch on.  You can watch Kristine and Monica use the technique here. (Thanks for the tip Lalia)

So don't forget to check out our entrants as well as our amazing Design Team.